Thursday, 31 December 2015

Linux on PS4: Fail0verflow showcase Linux on the PS4, run a Pokémon Demo (video)

As we guessed last week in an article entitled “Fail0verflow to announce a PS4 Jailbreak Next week?“, Fail0verflow announced today at the CCC that they owned the PS4 and have Linux up and running on the PS4. They did a very short presentation to showcase the hack, and ran a Pokémon game within Linux on the PS4.

Tuesday, 29 December 2015

Breaking the 3DS: how the 3DS was hacked – Presentation by Smealum, Derrek, and Plutoo

Smealum, Derrek, and Plutoo had a Keynote at the Chaos Communication Congress (32C3), and the recording of the video is now online (embedded below)
In the talk, the 3 hackers explain how they broke the security of the Nintendo 3DS, which led to a lively 3DS Homebrew scene. They first describe an overview of the system (specifically details on the ARM11, and ARM9, the security CPU).
They then explain how they breach through the 4 levels of security (ARM11 Userland, ARM11 Kernel, ARM9 Userland, ARM9 Kernel), and how they involved the GPU to get access to the RAM. An interesting anecdote from Smealum is that in practice, the ARM9 Kernel has an unintentional syscall backdoor. One can feed it any operation pointer and it will run in Kernel Mode. ARM11 doesn’t have direct access to it, but anything in ARM9 can access it, meaning once a hacker gets Userland ARM9 access, it’s equivalent to getting Kernel access to that CPU. This makes the last layer of security pretty much moot.
3DS_arm11_overview
The hackers added a few tongue-in-cheek pieces of advice for Nintendo and other console manufacturers, in particular “Secrets hidden in hardware are great, unless you leak them”, in reference to how they managed to extract encryption keys shared by the Wii U and the 3DS.
3DS_hack_takeways
There’s alot being explained and I won’t summarize it all here. You can see the full presentation below. If you have interest in console security and hacking ( and if the words ROP, Webkit, NX don’t scare you), it’s a must see!
Note: the presentation actually starts 15 minutes into the video.
One important point from Smealum is that he believes the 3DS homebrew scene is lively and growing. He emphasized his disagreement with Fail0verflow’s statement a few years ago that console homebrew is dead. He showcased a cool screenshot if existing 3DS homebrew.
3DS_homebrew
Last but not least, at the end of the presentation, Smealum announced the release of Browserhax, Ironhax, and Menuhax for the latest 3DS firmware 10.3. The release of at least Browserhax was made simultaneously with the Keynote. Details here.

Sunday, 27 December 2015

3DS: Gateway Ultra v3.6 Public Beta released

A few days ago, Gateway announced a new version of the software for their popular piracy dongle, the Gateway 3DS.
This new release includes an in-game menu to configure and search for cheats, improved game selection menu, and improved cheats engine.
There’s not much to say here that has already been said about Gateway3DS. If you already own a Gateway3DS, you’ll probably enjoy this new release. If you don’t own a Gateway3DS, I personally would not suggest to buy one (given their shady business practices), and instead wait for free tools such as RXTools to come up with a free alternative.
gateway_ultra
The full press release from Gateway3DS:
Merry Christmas Y’all! Team GATEWAY is back with a nice update for our loyal userbase to enjoy!
Today we present GATEWAY ULTRA v3.6! Read on for more info on the new functionality..
But lets start with the full featurelist:
* Added in-game menu!
– Configure cheats (supports CIA and 3DS formats)
– Search for cheats
– RAM dumper
– Hex editor

* Improved game selection menu!
– Switch game language instantly
– Switch between classic mode and Gateway mode instantly
– Handy SYSNAND/EMUNAND indicator
– Smooth and fluid movements
* Improved cheats!
– More memory (x4!)
– Repeat code Cxxxxxxx fixed
In our last release we gave you a taste of our new cheat engine, today we take it a step further by
putting cheat hacking capabilities in YOUR hands! We’ve added a way of overriding the language auto
detection for games which has been requested a lot! We also got a request to increase the available cheat space,
so we quadrupled it! This should give plenty of space!
You can press the UP key in the game selection menu to get a list of options which allow you to
set the mode and language as well as the activator key you want to use for our brand new in-game menu!
The in-game cheatmenu offers all kinds of exciting functionalities for cheaters and aspiring
hackers. There’s a classic “cheat search” which allows you to scan for 8, 16, 32 bit
values (both signed and unsigned) and lets you select various conditions (greater than, less than,
equal, exact value, etc.) to narrow the number of possible memory locations. Like magic, within
minutes you will be able to find the memory address that holds the player’s lifes and directly
edit the memory from the in-game cheat menu! If that’s not enough, advanced cheat hackers can directly
enter the hex editor and hack away at writable memory regions at will.
Furthermore you can create RAM dumps to the microSD card in the Gateway Red card if you plan to do analysis of these on
your computer rather than use our cheat finder. The format for the dumps files is as follows:
* 32 bit header with number of memory mappings (mapcount)
* mapping info objects [int vaddr, int paddr, int size] (12byte per entry)
* data for each mapping, stored consecutively
Note that most of the ingame functionality requires the Gateway Red card and a microSD with some writable space available
for temporary memory storage.
As always, enjoy! There’s still much more to come! Support the true innovators!
Source: Gateway3DS

Wii U emulator: Cemu 1.2.0 released

Cemu, the popular (if highly experimental) Wii U emulator for Windows by developer Exzap has just been updated to version 1.2.0. This new version brings some level of audio support.
The previous release of the Cemu Wii U emulator had fixed issues with AMD graphic cards, which was a very awaited release.

Wii U Emulator Cemu – The full changelog for 1.2.0:

  • Added basic audio support
  • Added support for GX2 stencil buffers
  • Improved controller options
  • Miscellaneous bug fixes and small improvements

Cemu Wii U emulator: Games compatibility

The Cemu Wii U emulator is still work in progress so a full compatibility list would be moot at this point, but GBAtemp user t65xwing posted the following observations (keep in mind that this is not an official compatibility list at this point, but only the tests from one users. Other members at GBATemp have reported success with some of these games):
Wii U emulator Cemu 1.2.0 running Mario KArt 8
Wii U emulator Cemu 1.2.0 running Mario Kart 8
Angry Birds: Star Wars – No changes – Boots, then gets stuck on an infinite black screen
Bayonetta 1 – No changes – Crash on load
Captain Toad – No changes – Crash on load
Deus Ex: Human Revolution – No changes – See one of my previous posts on info on Deus Ex, which gets in-game. From 3 to 4 fps in-game
Donkey Kong Tropical Freeze – No Changes – Infinite black screen after starting the campaign
Ducktales Rematered – No Changes – Infinite stuck on loading.
Game & Wario – No changes – Crash on load
Hyrule Warriors – No changes – Crash on load
Injustice Gods Among Us – No changes – Infinite stuck on loading.
Kirby and the Rainbow Curse – No changes – Crash on selecting game-mode
Lego Marvel Super Heroes – Minor changes – Now shows more loading screen stuff, though all is still broken.

Mario & Sonic Olympic Sochi 2014 – No changes – Infinite loading
Mario Kart 8 – Changes – SOUND! Mario Kart Stadium from 3-11 FPS to 10-14 FPS, It’s actually pretty playable now.
Mario Party 10 – No changes – Crash on load
Mass Effect 3 – No changes – Crash on load
Monster Hunter 3 – No changes – Boots, but gets stuck on an infinite black screen
NES Remix – No changes – Ges ingame and appears fully playable if it weren’t for the low framerate
New Super Luigi U – No changes – Crash after ‘Press 2’ to try to get in the menu *
New Super Mario Bros U – No changes – Crash after ‘Press 2’ to try to get in the menu *
Nintendoland – Changes – Has sound added which appears to be perfect, Allows to get much further. Text on Backbuffer, image on Framebuffer 0 (After a certain point has to switch to FB 4)

Sonic All Stars Racing – No changes – Stuck on loading
Splatoon – Changes – THERE IS SOUND! From 11 to 13,5 fps
Super Mario 3D World – No changes – Crash after supported controllers screen.
Super Smash Bros – Minor changes – It boots once again, showing a slightly flickering screen, it goes to a full black screen after a few minutes, at which point it’s stuck.
Wii Party U – No changes – Crash on Load
Wonderful 101 – Minor Changes – It now boots into an infinite black screen.
Yoshi’s Wooly World – Minor changes – It boots once again, gets to an infinite black screen after it’s finished loading.

Xenoblade Chronicles X – Changes – Configure the D-pad to navigate through the menu’s, plays the cutscene after Character Creation. In-game cutscene is so broken there’s no point in continuing. Backbuffer has subs. Framebuffer 28 shows an image. It’s even worse than Deus Ex. At some point you ave to enter your name with the gamepad. I don’t think you can progress further.
ZombiU – No changes – Crash on Load
Wii U emulator: Cemu 1.2.0

* Specifically for New Super Mario Bros U and New Luigi U, other members at GBATemp have mentioned that one can actually play these games at 30fps already, provided they have the right files installed already. Also keep in mind that compatibility highly depends on your PC’s GPU (NVidia, AMD, or Intel – Intel being not really supported at this point)
Although this Wii U emulator is very recent and far from perfect, users are reporting that some games are already running at 30fps, and welcome the sound addition of this new release
The video below by GBATemp user WarDoctor shows the Wii U emulator running Mario Kart:

Download Cemu 1.2.0 – Wii U emulator for PC

Source: Thanks @Zecoxao for the tip!

Sunday, 20 December 2015

Loadiine Wii U backup loader being ported to older firmwares

The popular Loadiine rom loader for the Wii U is being backported to older firmwares.
Initially released for Wii U firmware 5.3.2, Loadiine has now been ported by the GBATemp community to firmwares 4.1.0, 5.0.0, and 5.1.0 by different developers.
Developer ptileray has a 4.1.0/5.0.0 compatible port of Loadiine going on here. Another port, compatible with 5.0.0 and 5.1.0 is driven by NotKit and can be foundhere.
Depending on the port you use, Loadiine is now compatible with all these firmwares. In order to run Loadiine, you’ll need:
  • Wii U FW 4.1.0/5.0.0/5.1.0/5.3.2
  • SD(HC) Card
  • (Optional) Super Smash Bros for Wii U (Disc or EShop version) – optional but may be needed for some games
loadiine
You can find a list of compatible Loadiine roms on GBATemp.

Help, I’m on a different firmware, what do I do?

If you’re on a firmware below 5.3.2, one option is to update to firmware 5.3.2 via a Disc. Yoshi’s Woolly worldMario Party 10, and Splatoon are known to ship with firmware 3.5.2.
If your Wii U is above firmware 5.3.2, there’s not much you can do at this point. Hopefully the upcoming Wii U 5.5.0 exploit from Hykem will unblock you soon

Friday, 18 December 2015

Upcoming Wii U hack for firmware 5.5.0 announced for Christmas

And here I was, complaining that this year’s Christmas hacks were not coming. Now we’ve got announces of a Kernel exploit on the PS4Black-fin on the PS Vita, and today, an IOSU exploit release on the Wii U.
Hykem, known for his hacking work on manymany consoles, just confirmed he’ll try to release a Christmas present for Wii U owners. He’s clarified today on GBATemp that he has an exploit running on IOSU, up to firmware 5.5.0, the latest and greates Wii U Firmware.

Wait, what’s IOSU on the Wii U?

Alright, for those of us not familiar with Wii U hacking, IOSU is basicallly the operating system of the Wii U when it runs in Wii U mode. It’s what we could compare to the “native” world on the PS Vita per opposition to the PSP Emu. In particular, IOSU is responsible for security checks on the Wii U, verifying that you’re not trying to run unsigned code, etc.
So yep, having compromised IOSU is a big deal.
wiiu

Hykem’s exploit on Wii U 5.5.0

Hykem confirmed he compromised IOSU, and that his exploit works up to firmware 5.5.0. His exploit does not require PPC Kernel access, which means kernel exploits won’t need to be revealed for this one to work. (in other words, the Wii U scene has several aces up its sleeves and won’t need to reveal all of them at once).
Hykem wants to release the exploit for Christmas, but he points out there is still lots of work to do, specifically:
  • Port the exploit to all firmwares where it makes sense (I’d say that it’s most important to release it for the latest firmware first?)
  • Obfuscate the exploit so that Nintendo have a hard(er) time patching it, giving more time for users to be aware of the exploit release.
  • Add mechanisms to the exploit so that people don’t update by mistake. This probably means an option set by default to block auto updates and block specific Nintendo addresses such as nus.c.shop.nintendowifi.net
So, at this point there’s no guarantee this will be released exactly on December 24, but Hykem’s confirmed the exploit and his intent to meet this deadline. His full statement:

Time to clear the air again. :rolleyes:
The following statements are facts:
– I have successfully compromised the Wii U’s IOSU;
– The exploit being used works from 2.0.0 up to 5.5.0, but it obviously needs to be ported for each firmware;
– The exploit doesn’t need PPC kernel access, so the new kernel exploit won’t have to be released.

I want to do some kind of Christmas surprise yes, but take that with a grain of salt. I can’t promise I will have the time to get everything ready by then and I’m not disclosing what will be released.
Keep in mind that releasing the exploit “as-is” is pointless, so it will have to be ported first and most likely obfuscated so it will take a little longer to patch. It’s also worth noting that I will have to develop an easy way to block updates so no one updates past 5.5.0 by accident.

If you don’t believe in anything stated above, that’s not my problem. The best (and easiest) thing to do is wait and see.

How to fix PS4 Disc Auto-Eject Issues. Tips & Tricks

Heeey folks. I am not sure if there is already a guide or article about this soooo I decided to post one for those who experience the infamous auto-eject bug that happens to almost(?) all ps4’s out there. Specially the older units. Feel free to approach me if there’s a post about this one and I will delete this immediately.
First of all, I hate the fact that the ps4 uses a touch sensitive eject button. This is the main cause of all this shenanigan happening to our beloved ps4. The most irritating part is when it happens in the middle of a game and God forbid, during a Boss fight. So here are the stuff I learned from my fellow gamers here in the PH and the internet of course. Enjoy!
1. Change the position! Some of you might not know this issue because of the fact that your PS4 is positioned vertically (Some people say that this permanently fixes the problem). I heard that the PS4 is designed to be used this way but I prefer the other way around coz i love the diagonal design of the ps4 .
2. If you prefer to have your ps4 horizontally chilling beside your TV, then you might wanna try to raise your PS4 up off the ground by placing a couple of CD cases underneath
3. Wipe the dust from the eject button.
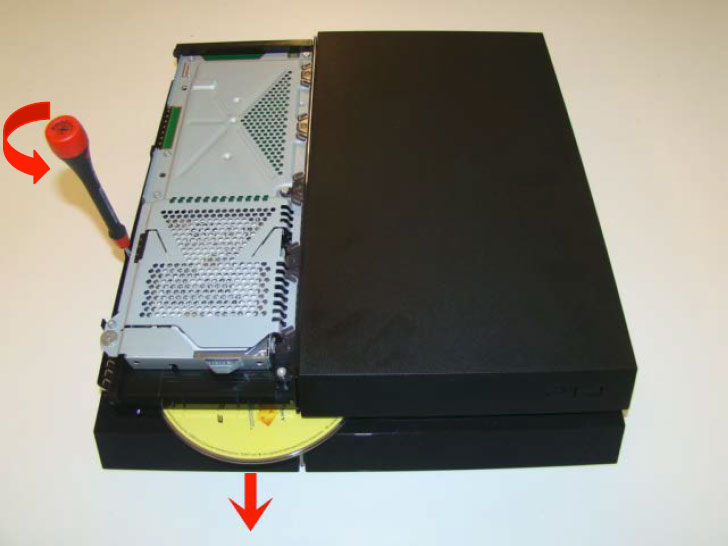
4. Remove the hdd panel, the glossy part by sliding panel and tighten the manual eject screw. See pic below
ps4_blu_ray_stuck

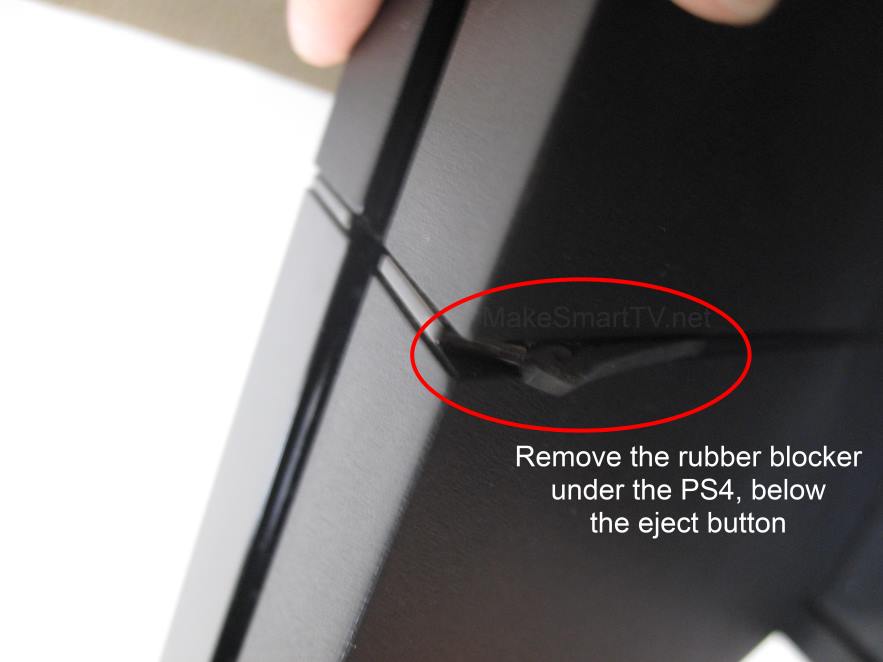
5. Remove the rubber foot located at the center of the console. The one touching the eject button. This rubber expands when the ps4 is used for long periods of time specially if you are playing/grinding on BloodBorne 😀
6. If for some reason your PS4 doesn’t accept your game after an auto-eject happens. Do the following:
* Hug your mom and tell her how much you love her 😆
*Power down the PS4, unplug the cord and press the eject button while unplugged. You will hear a few beeps
then turn it on and voila! You just made your mom happy and fixed your console

7. Boot into safe mode, and re-initialize the PS4. Switch of PS4 using power button on main control panel, once the PS4 is off, press and hold the power button. Release it after you’ve heard two beeps: one when you initially press, and another 7 seconds later. See pic below.
Last option is to use option 7 in safe mode and re-install firmware or return the unit to Sony for warranty claim.
update:
Hey guys its been a while.. i have been playig the witcher 3 slowly and enjoying every bit of its vast open world. i just want to share a few of my silly experiments with regards to this auto-eject syndrome.
8. put the ps4 upside down. 😆
this may sound silly but it works. i was able to kill nekkers and other beasts for a month without auto eject. 😀
after a month, the problem re-occurred so i decided to do something else.
9. Put tapes on the sensor.
i am doing this for 2 days now and so far no auto ejects.
i will be updating this thread when i have the chance..
note: you can combine these tips and share your experience..
happy gaming

PS4 Disc Issue: the ultimate fix

Heeey… Assuming that some people have been reading my tutorial here, I will be posting my final update on this one.
After trying all the temporary fixes found all over the internet, finally I was able to permanently fix the auto eject issues on my beloved ps4.
Requirements:
  • PS4 (unless you have a Wii U or an xbone)
  • TR9 Torx Screw
  • Electrical Tape
Step 1 :
Open the ps4 by removing the warranty stickers (ooops.. no more warranty for you) and unscrewing the 4 screws at the back of the ps4.
Step 2:
Lift the bottom cover of the ps4 and locate the small sheet of gold metal and put a small electrical tape on it.
Step 3:
Close the ps4 and put all the screws again
Step 4:
PROFIT!! Your warranty is voided and you have disabled the eject button of your Ps4. Now you have to use the controller every time you have to eject your discs.
Again, Happy gaming!!!
Note: i got the pics from my fb page where i shared the tutorial to my fellow Filipinos. 😀